We just wrapped on a serious bucket list dream of ours: putting a pool in our backyard. It’s something we have talked about for over a decade and finally took the plunge.
Putting in an inground pool is not something for the faint of heart. The time spent planning, saving, and then digging; the huge mess, including tearing up your existing landscaping; and the cost, of course, which always seems to find a way to go up, no matter how much planning you’ve done – can definitely take a toll on you and your family.
Now that our pool is mostly done and we have been enjoying it, it all seems worth it, of course, but hanging on to that dream of the future can start to slip away when your backyard has become a seemingly never-ending mud pit.
That’s why today I’m going to share all about our pool, including my best tips for anyone considering putting in a backyard pool. I’m going to pull back the curtain on costs, what the timeline is like and what I would recommend now that I’ve gone through the process.
Our Backyard Pool: Before and After
Before I dive in to all the particulars, here’s a short video I made with the process from start to finish! It was crazy going through all of the pictures and videos and pairing it down to just one minute worth of memories.
View this post on Instagram
It’s wild to think that before we put in the pool, that part of our backyard was pretty unusable. It was too sloped to really play on or use for anything, so we just planted grass and landscaped it to look nice, but we couldn’t really use it. While putting a pool in a sloped yard is definitely trickier than a perfectly flat space, there are contractors who are able to build on this type of landscape and can make it look seamless. Plus, by putting a pool in, we’ve doubled our usable outdoor space – which is awesome.
We learned a lot along the way, so here are my tips for other people.
1. Do Your Research:
Well before you start calling local vendors, do your own research. Look realistically at your yard and the space you have. Do your own measurements and figure out what size you can actually fit. Then, do tons of research on shapes of pools that fit those measurements. Don’t wait for the pool designer to come out and tell you, because they are going to actually be looking at YOU to tell THEM what you’d like. If you don’t know, there’s a higher chance of the finished design not being something you’re happy with.
Plus, I found that each contractor had their own ideas, some even suggesting we put the pool on the top part of the yard, etc. By having a clear vision ahead of time, we were able to focus in on the right contractor who could bring our vision to life.
When looking for pool inspo, pull details from varius sources. It’s likely that there isn’t going to be one perfect pool for you. For example, one pool that inspired the design of my stairs and keeping the hot tub pool level was this one that belongs to @younghouselove. I loved the wraparound bench, which we also incorporated.

This pool belongs to @younghouselove
For me, I did months and months of research on backyard pools and even resort pools to get inspiration. I used Pinterest and Instagram to search for pools. I followed hashtags on Instagram, like #backyardpool, #pool, #pooldesign, and more, so that I could see new posts with those pictures on my feed. I also followed DIY designers who were sharing their own pool builds, so I could see how they made certain decisions.
I was also really inspired by this pool by @jillian.harris. I borrowed her idea for having lots of water jets. Our designer tried to talk us down to 3 or 4 max, said he’d never done more than that, but I had this image to inspire me and we ended up going with 6, which is perfect for us.

This image is courtesy of Jillian Harris
2. Start a Design Board:
By the time we had a pool designer picked out, I already had a really clear idea of how much pool we could fit in the space and designs I liked that could fit. I knew I wanted our pool to have a similar vibe to the gorgeous pools I saw when I visited Greece way back in 2002. The bright white plaster pools with blue and white tiles, fringed umbrellas and natural textures has been stuck in my brain ever since. This inspired all of our plans and I fused it with lots of design details I saw in other pools I liked.

Here they are installing the white plaster!
I started adding all of these details to a design board, so I wouldn’t forget them and could clearly communicate them to our pool designer. In our case, we only had 3 drafts included with our pool package, so we needed to slay the design really quickly. We really didn’t want to go over budget (costs were already skyrocketing due to supply and demand, as well as material shortages) and going over on design drafts was costly.
Here are some of the details we knew we wanted before we met with our designer:
- Combination of rounded and square details. I didn’t like pools with all squared off details or all rounded details. The mix was more interesting to me.
- I liked lots of stairs, sitting ledges, etc., so kids can easily, safely move around.
- I wanted a small hot tub
- The hubs wanted a sun shelf
- The kids wanted a waterslide
- I wanted a white plaster pool with blue tool
- We liked the idea of a water feature, either water jets, scuppers or a small waterfall
3. Ask for Referrals:

Time to start digging!
Most companies have good reviews on sites like Yelp, because they’re asking for reviews from their happy customers and it’ll often drown out a bad review. The best way to get good information is to ask your community for referrals on sites like Nextdoor. Ask people if you can see pictures of their backyards. Look for trends in who is most often recommended or common themes around a certain pool builder.
For us, we narrowed it down to three local pool contractors and then two. Then, we looked at both proposals line by line and took their reputations in consideration.
4. Make Smart Swaps:
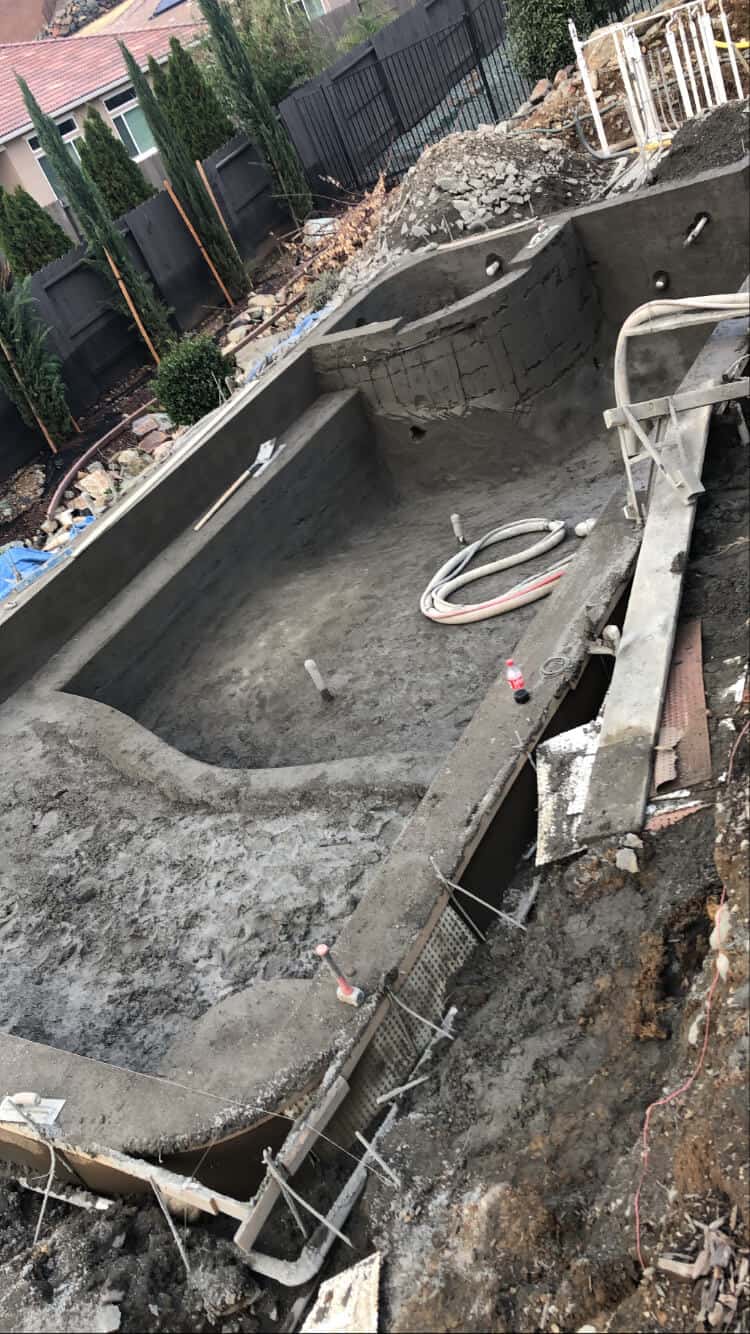
The gunite is in and the shape is now set!
It’s really difficult to get proposals back and have them be so far over budget. It can seem impossible to get something you want for a price you can afford. We had this happen, too, and one of us (not me) said, let’s just get a bigger loan and go all in, while I felt like there are ways to make cuts and still love the finished product.
We were able to get the proposal down by making smart compromises that worked for us and haven’t regretted it, but it can cast a shadow early on in the process.

The finished pool
Here are some decisions that we made that were right for us when getting the proposal to match our budget:
- We cut the water feature, which was coming in at $10,000, and instead put in 6 water jets at $200 each. This only cost us $1200, but adds so much fun and detail to the pool when everything is on. We haven’t regretted this one at all.
- We got a different water slide, which saved us $2000. The original slide we wanted looked cooler, but actually had reviews that it wasn’t safe for small kids, so we have never regretted this one.
- We dropped the raised hot tub. It was going to be elevated 12 inches to allow for nice water sound, but we dropped it pool level. We have never regretted this one, in fact, we are glad we did it, because it’s safer for the kids.
- We went with white plaster, which is actually an affordable choice, and it’s what we wanted originally. There’s a lot of pressure to get pebble-tek or fancy linings, but we wanted a super smooth, bright pool, and this has been perfect for us.
- We switched out the white travertine tile around the pool to just regular concrete. This saved us a ton of money. This is the only swap we wish we hadn’t made. We should’ve kept at least a travertine border around the pool and here’s why: Travertine is super smooth and stays cool in the hot sun. The concrete around the pool is brushed, so it’s rough on our kids skin when they climb in and out and has led to some scratches and sores on their feet. This is a really difficult thing to fix down the road.
- We reduced the size of the pool. Originally, in the first quote, the pool was too small. Then, they made it bigger, but it was out of our budget. We picked a size in the middle, which saved us a lot of money, but also gave us plenty of swimming space. we have been very happy with the size and I don’t think another foot or so would’ve been worth the money it would’ve cost.
These decisions can be hard to make in the moment, but this is what that mood board is for. Keep going back to that and remember that you’re going for a certain feeling with your pool decision. All the details are going to work together to bring you that vibe and outdoor aesthetic. Each individual detail doesn’t matter as much as the whole picture.
Using smart swaps, we were able to reduce the proposals significantly and still get a finished product we love.
5. Prepare For A Big Mess:
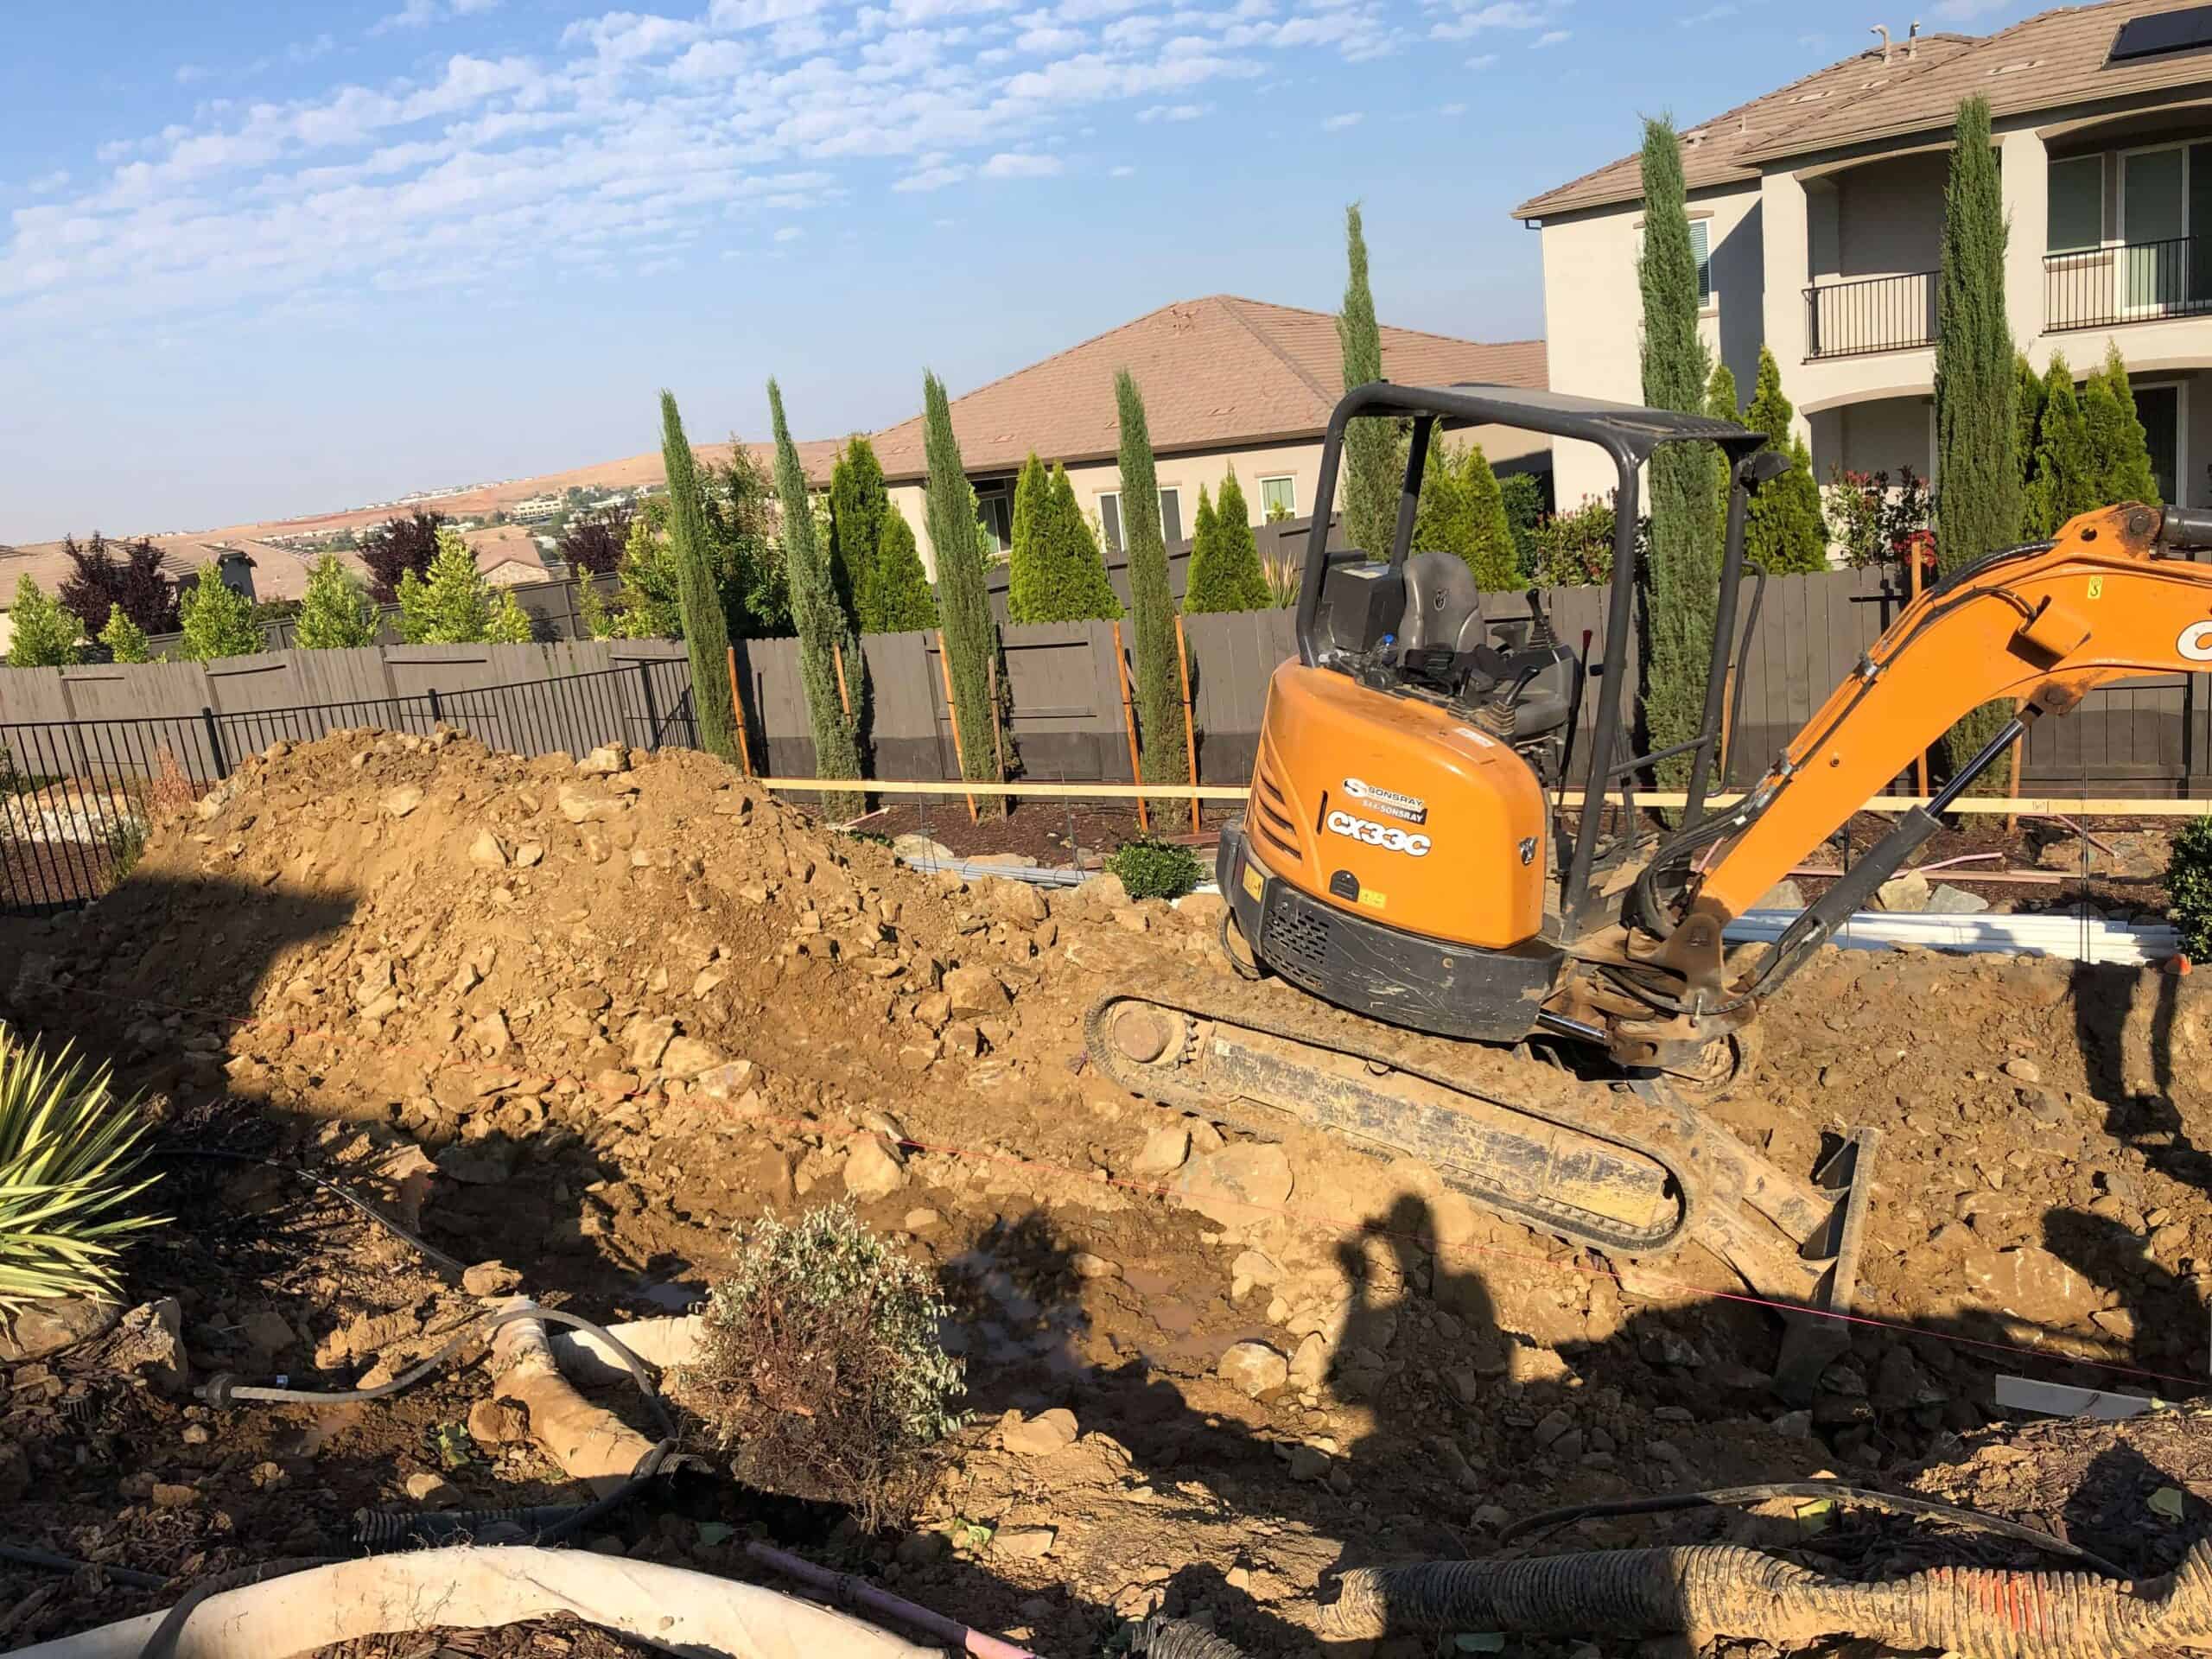
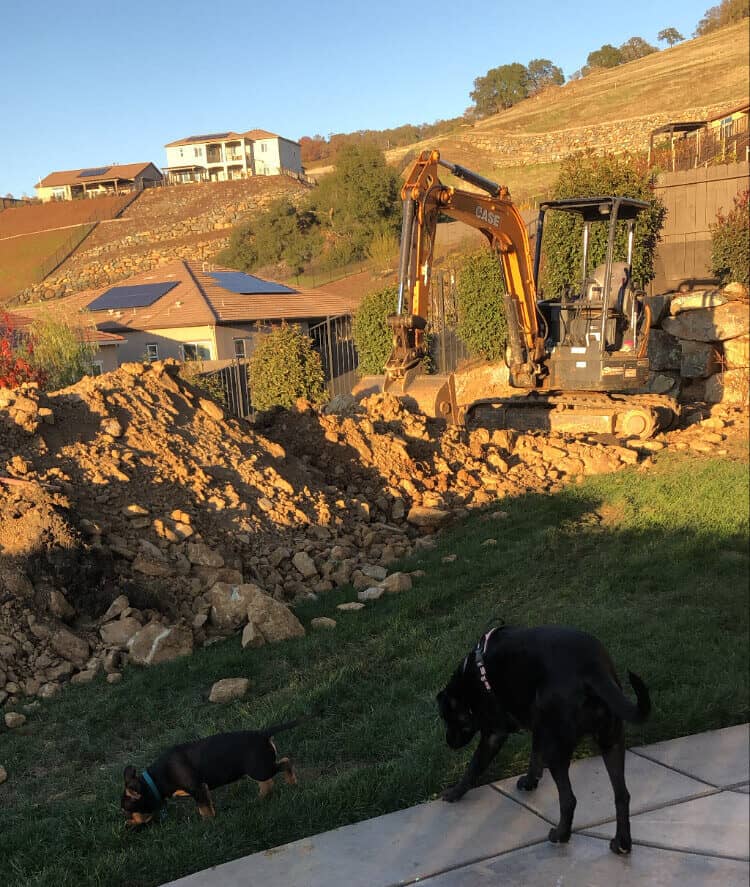
The one thing I didn’t research is what a mess it would be beforehand. Because our pool was going all the way in the back and bottom of our yard, the ditches that they dug had to go all the way through our yard to our house. The entire yard was a giant dirt pile for months. When it rained, these piles and pits became mud. It was a mess. Having two dogs that need to go potty outside was a disaster. We had to re-train them to go in the front yard and they had limited space to run around and play. I regularly had to wash them completely before bringing them back inside to get the dirt off. It was exhausting.
Because we started building before winter, we had weeks and weeks of nothing while they waited for the materials to dry enough to start work again. We expected this part to happen and knew it would slow us down, but I wasn’t prepared for how much of a mess it was all going to be. Also, because this was happening through winter, I also had to park down the street from my house when all the work trucks were at the house. No way I could go in and out of my garage all day, so me and the kids had to trek in and out from the car, multiple times a day, in the rain. I didn’t mind it as much as the kids did, but it’s something to think about. Where will you park your car when everyone is there? Where will you put your animals so they can stay safe and clean? What season will be the best for you to put in the pool, so it works better with your lifestyle? We don’t have big gatherings for the holidays, so it didn’t affect our holidays very much, but if we were the house for tons of visitors, it would’ve been a real mess.
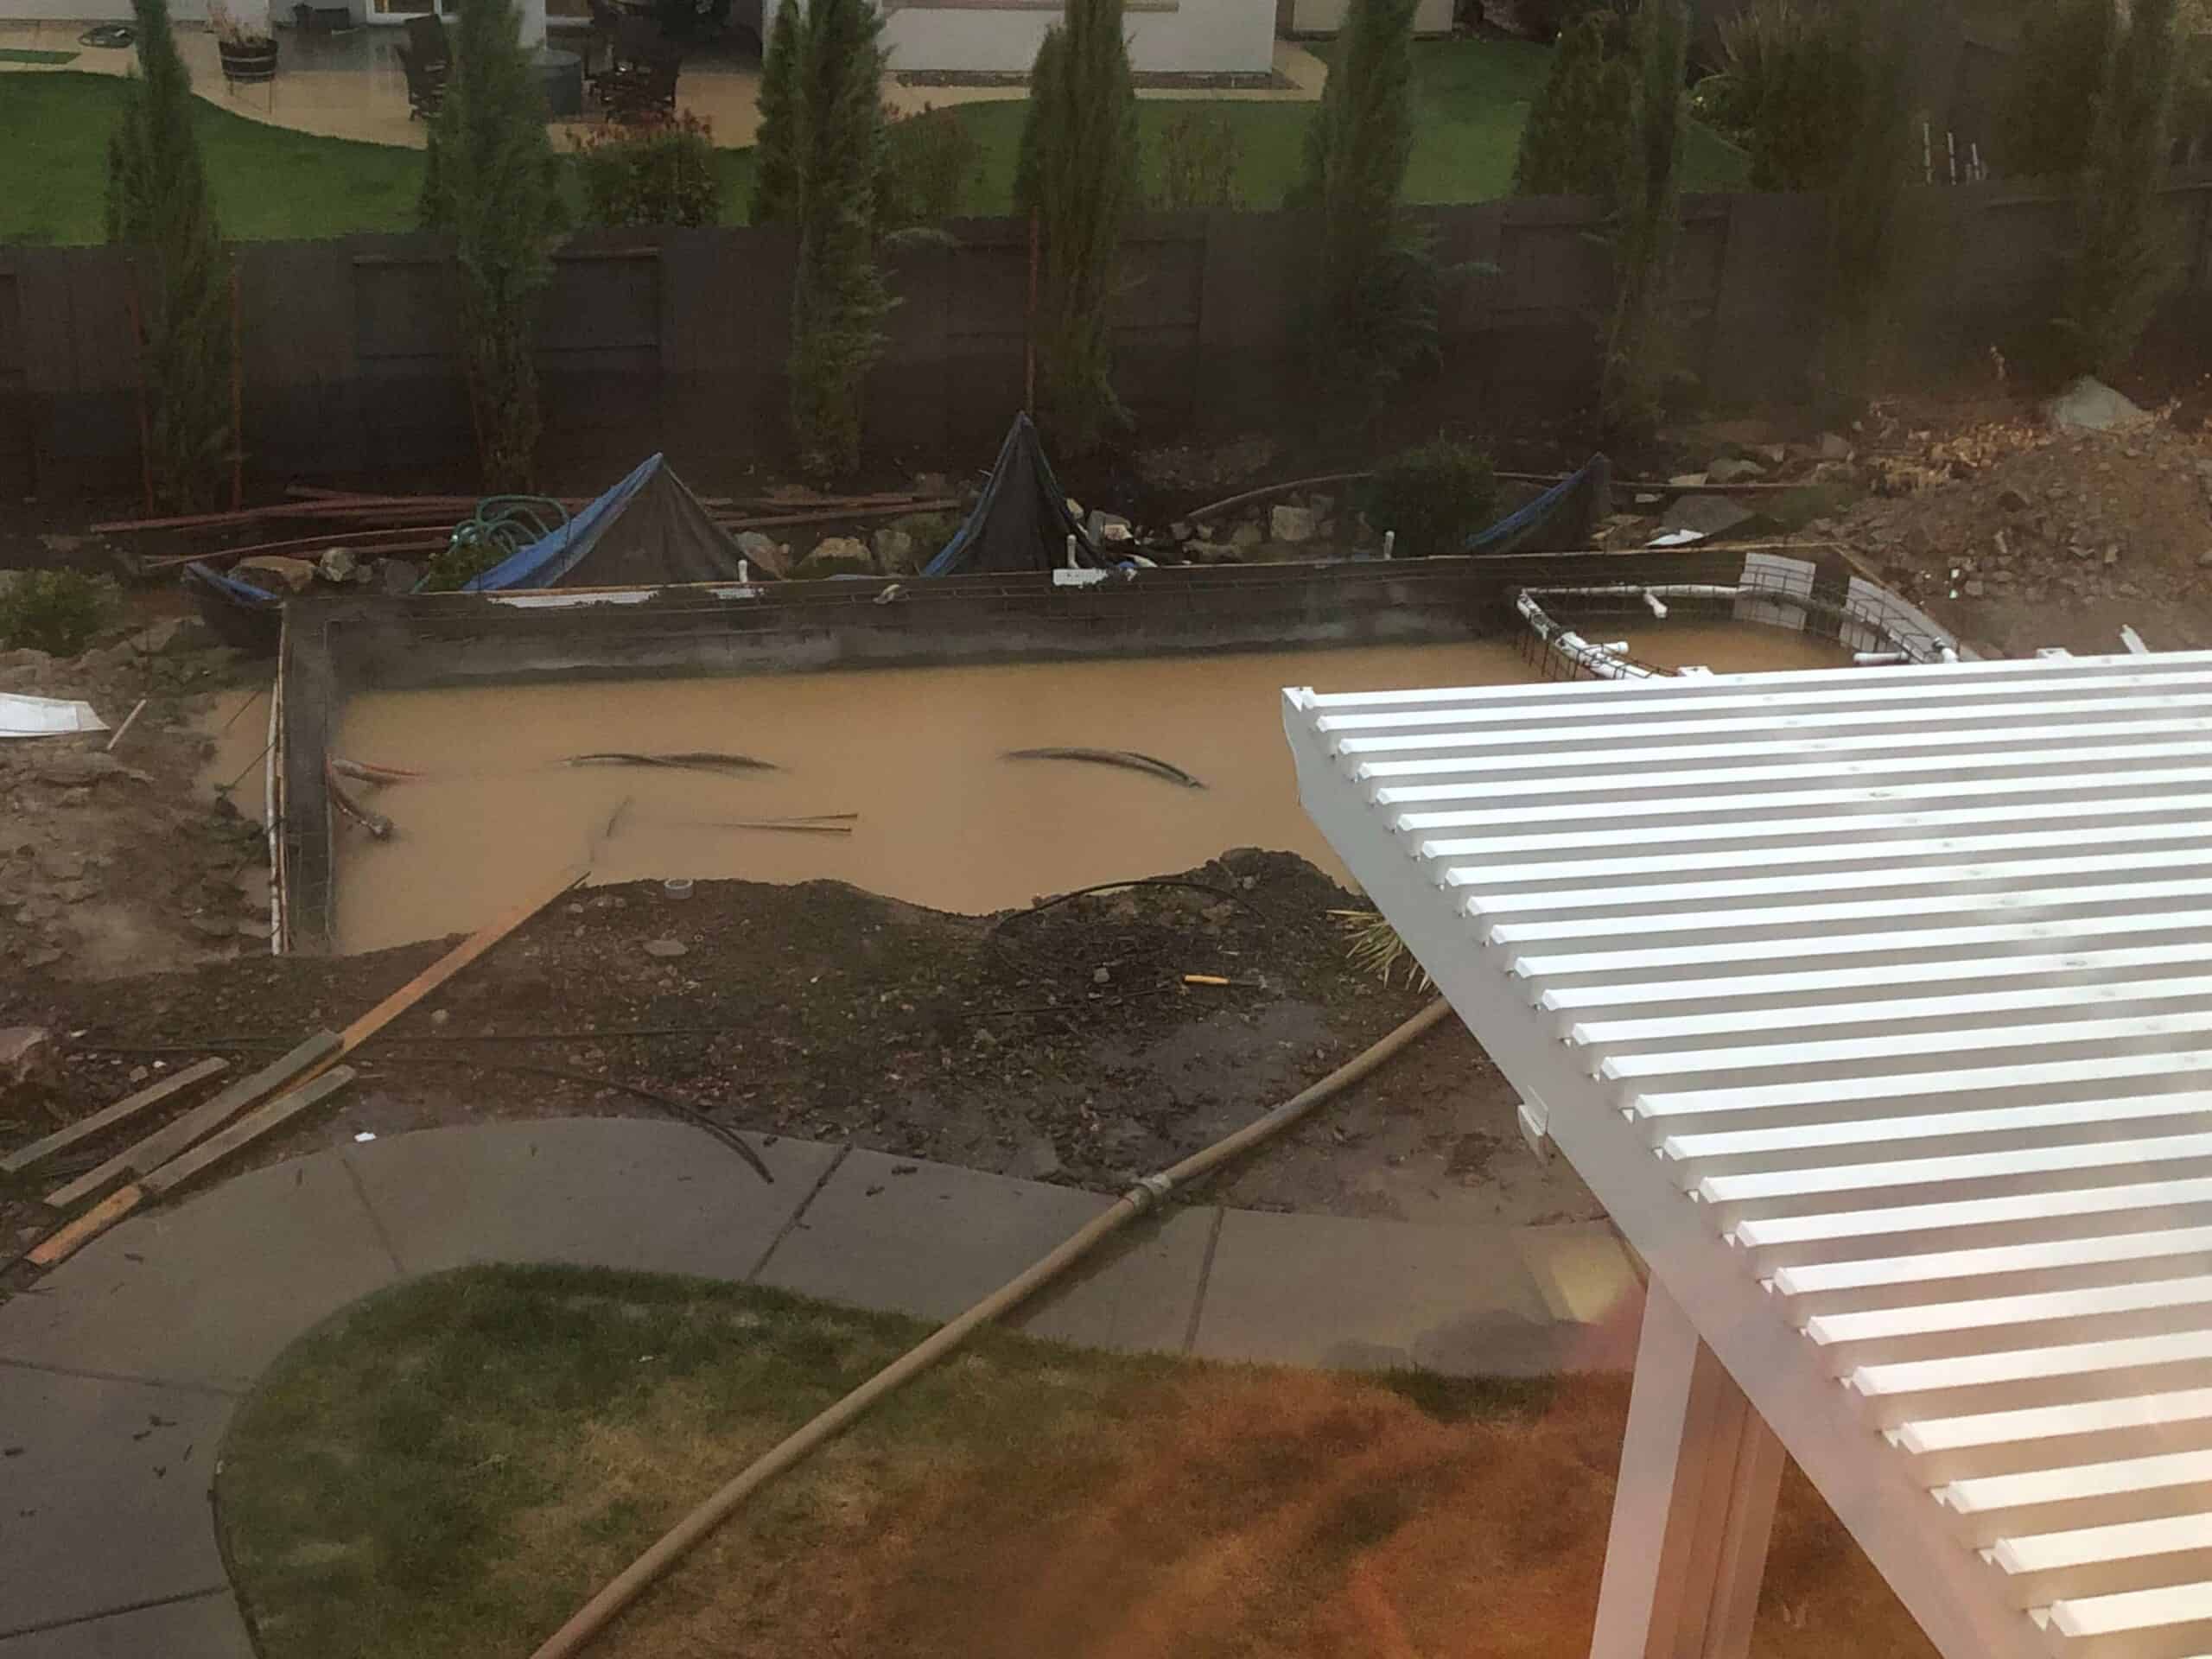
In the middle of winter, our pool filled all the way up with muddy rainwater. I was so nervous it was going to be ruined.
I still think we chose the right time of year to put in our pool for our lifestyle, but there’s no way around the fact that it’s going to be a huge mess and a real inconvenience for a long time. We didn’t go anywhere, for even a night, because we couldn’t leave the house, the dogs and the project. You need to be around to answer questions and to keep an eye on the work being done.
6. Expect the Unexpected:

The night we were told it was time to fill up the pool. I love how you can see the little rounded stairs and soft edges in this picture.
It’s going to happen. No matter how much you and the contractors plan, there are going to be things you didn’t plan for. Of course, it’s all going to be worth it when they tell you those magic words: “It’s time to fill her up!”
Here are just a few of the things we had happen that were not planned for.
The Retaining Wall Snafu:
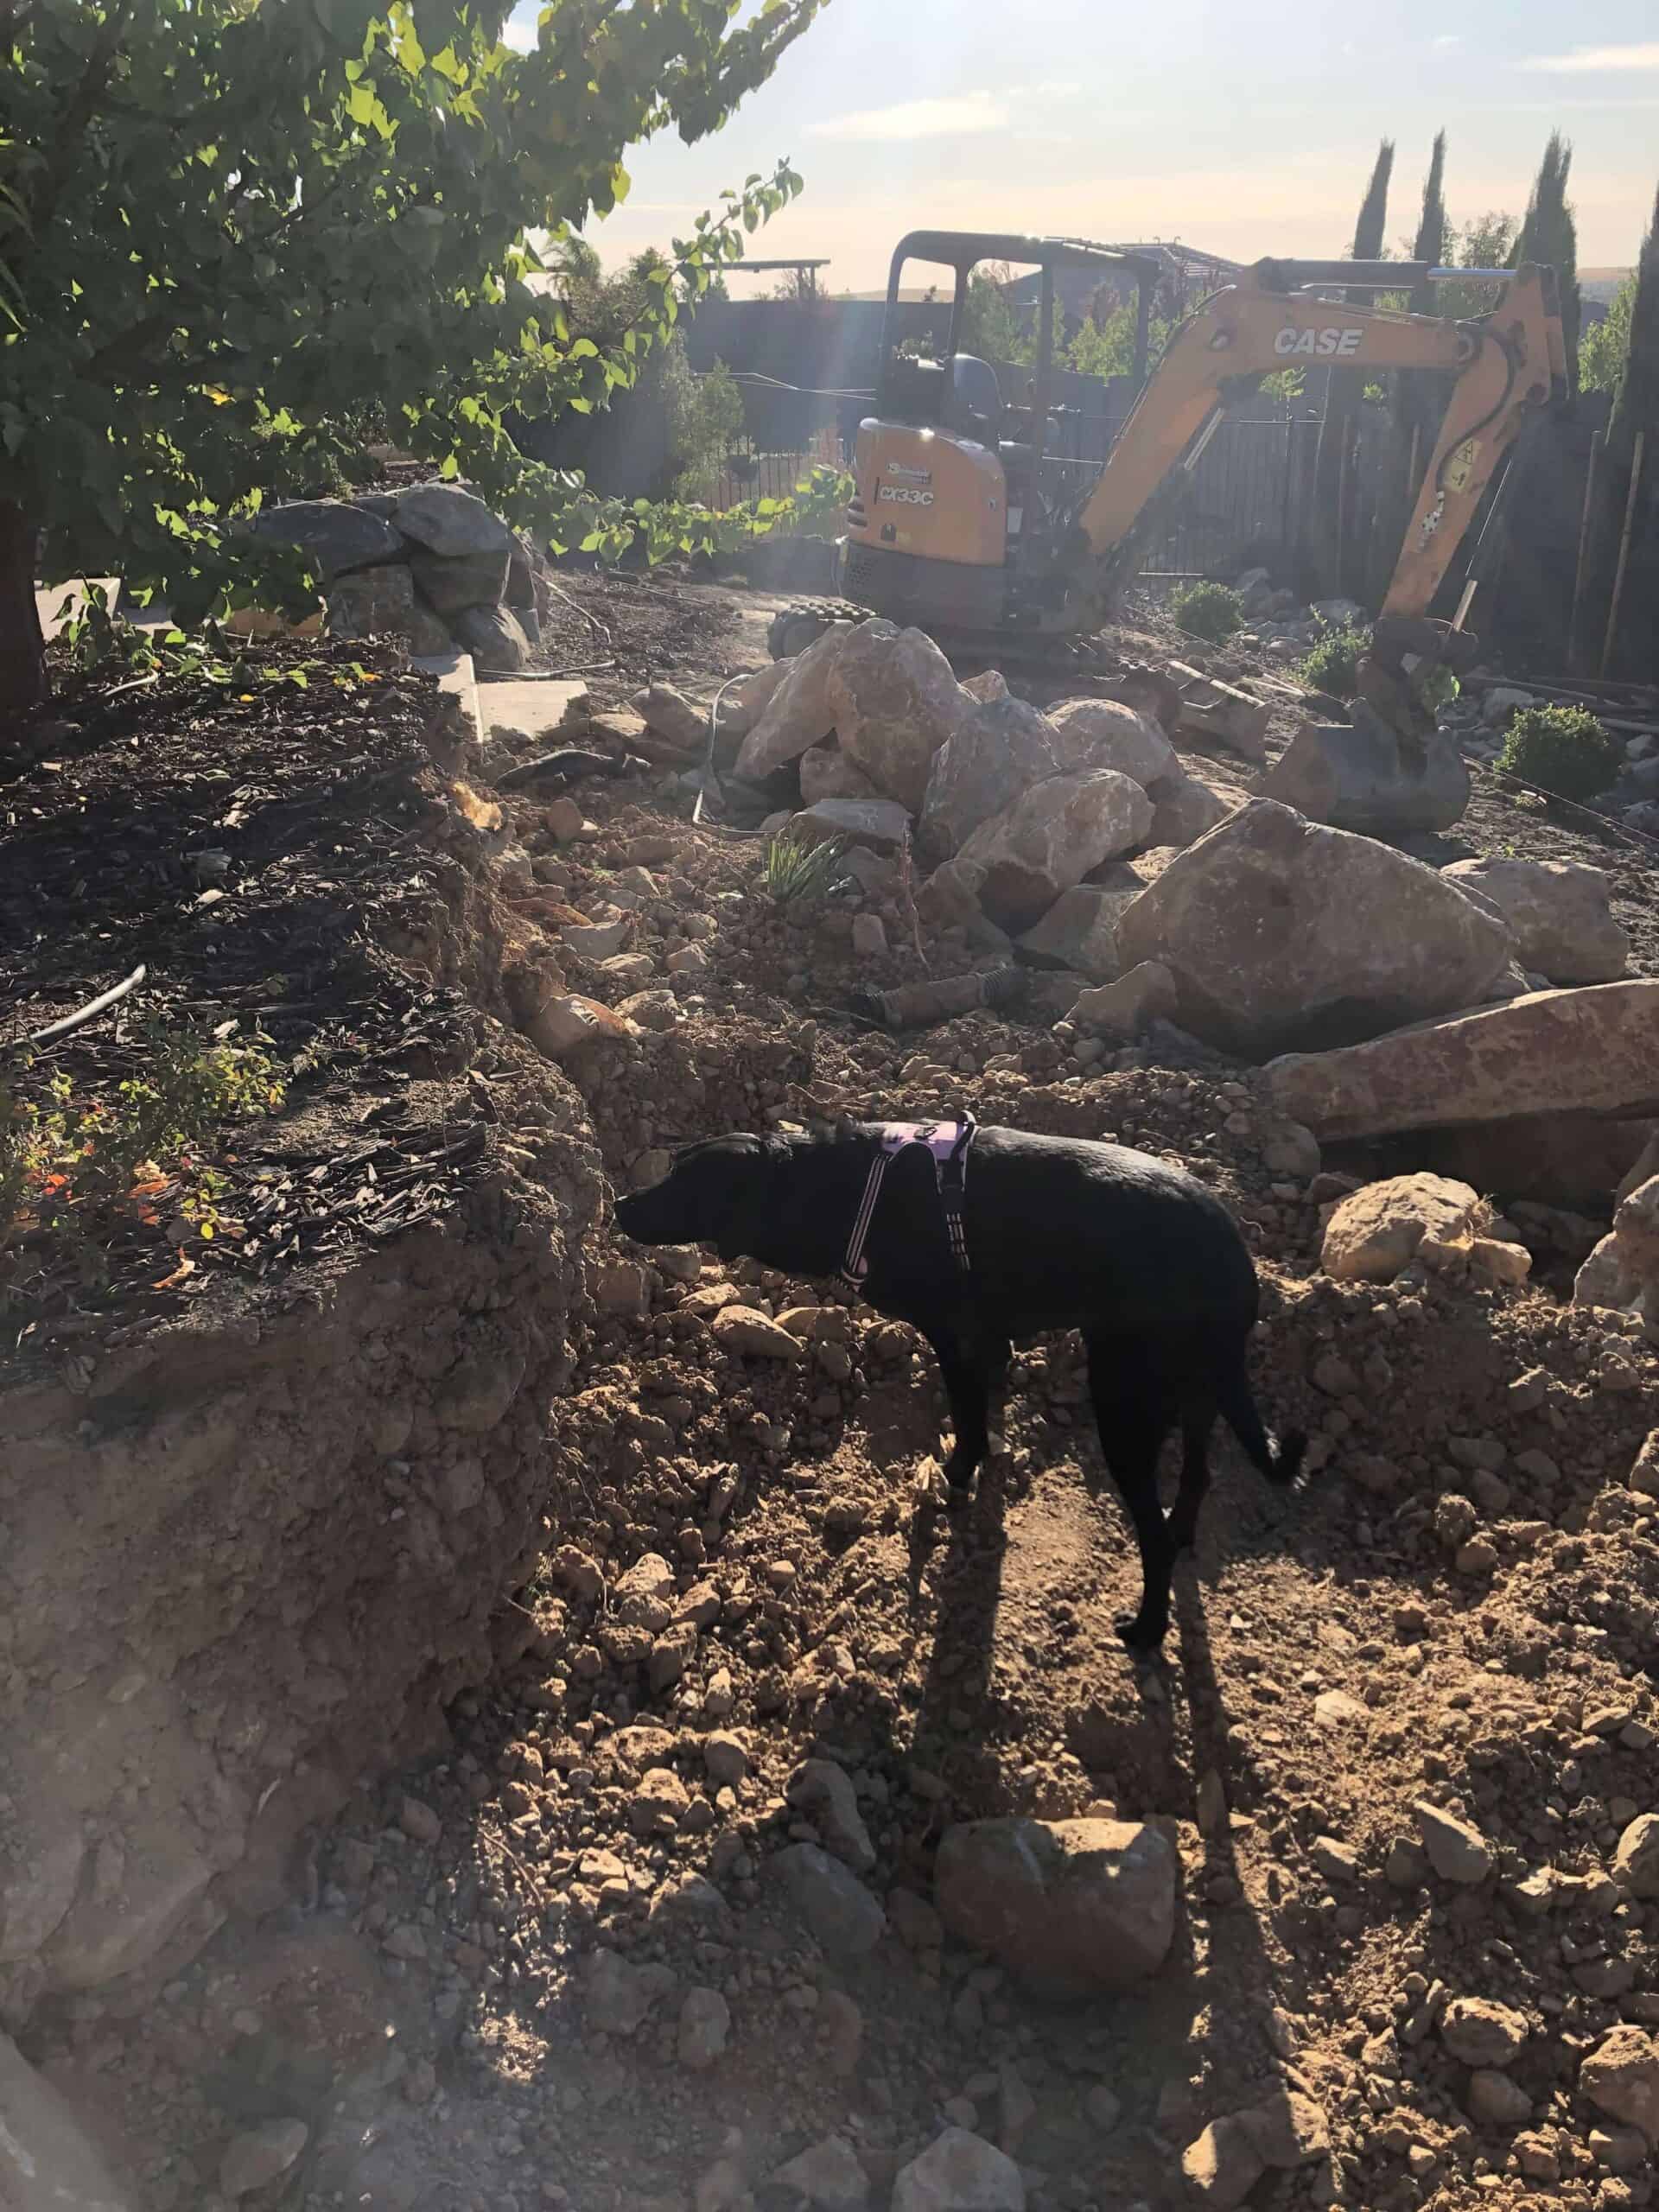
Our dog sniffing where the rock wall used to be.
After they started digging, they realized that the wall was put in at a very gradual slant, so they didn’t have as much clearance on one side of the pool as the other. It was significant enough that the pool wouldn’t have been approved (or look good) if we continued. We had two choices: remove the wall and put in a new wall ($$$) and keep the pool design as is or redesign the entire pool and get approvals again.
We decided to remove the wall and put in something more our style. It look soooo much better with the new wall and it kept the design as is. The pool company gave us a great deal on the wall, because it saved them a lot of money, too, to just keep moving forward, rather than have the project stop for weeks. It was a win-win for everyone, but certainly not expected.

The Walkway Damage:
After they were done digging and building, they started putting the dirt back in the ditches and this uncovered our original walkway. The diggers had damaged the walkways irreparably and big, black tire marks were etched into them. We didn’t notice, actually. I thought it could be cleaned off, but the owner of the company told us they were damaged and they would remove the walkways and replace them at their own cost.
They look much better now, however, this also meant two days of jackhammering straight, followed by a week or two of concrete design and concrete trucks. Annoying, for sure, but the end result is worth it.
7. Enjoy Your Pool:
View this post on Instagram
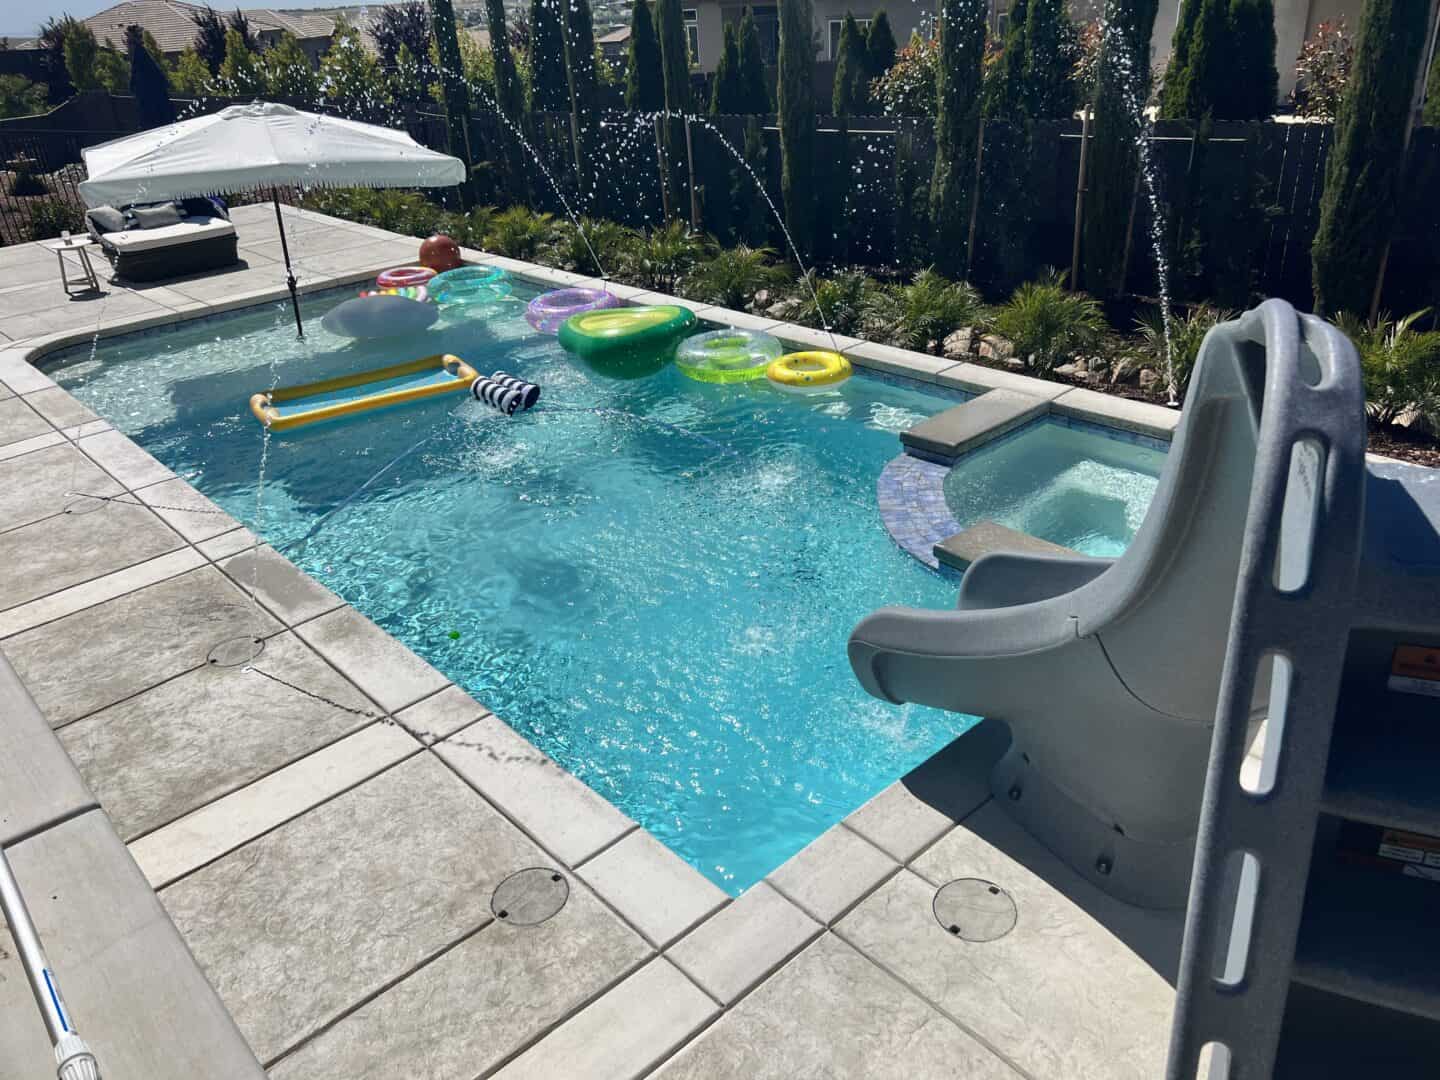
Yup, you earned it. This is a huge project. Ours took 7 months start to finish. We love 99% of the finished product and our kids want to live in it #SCORE.
But, there were lingering things we were waiting on that we could have let ruin our joy. As soon as that pool was ready to swim, we started enjoying it, even though not everything was finished.
Get all the floaties, get the comfortable chairs/loungers, grab your favorite sunscreen, and get out there and enjoy what you’ve worked so hard for. The memories are why you started in the first place, so don’t let that pass you by because you’re obsessing over tiny details.
We’ve found some amazing products that we would definitely recommend, too.
- Ultra-fine mesh pool cleaner net: This gets a lot more off the surface of the water than the first cleaner we had
- Pool vaccuum: Love this thing and also the blue color blends in
- Outdoor pool organizer: Such a great way to organize all the pool stuff.
- Pool flats: This mesh pool lounger is so good, the avocado is lots of fun, these sparkly intertubes are faves and I am obsessed with this rainbow Funboy float.
- Pool towels: These fold so small, dry really fast and are soft on your skin. Yesss…
- Sunscreen: The absolute best, smells like Hawaii, has a lower EWG score than most.
- Fringed Umbrella: Obsessed with this umbrella.
- Waterslide: A big splurge, but so worth it. Absolutely love it.
I’ll probably write a whole post with more as we find what works. Not everything has lived up to the hype, so only sharing what we bought that we really like. These are affiliate links, which means if you make a purchase through my links, I may receive a commission at no cost to you.
****
I hope this helps you decide if you are ready to put in that backyard pool – or just helps the process go more smoothly for you!
I’d love to hear any questions you have in the comments below!
Have a fabulous day,
E

What size is the pool? Swimming area? Ours is 14×33 and I wonder if wide enough for a slide!!
Author
I believe our pool is around 32 x 15, so pretty similar size!