Freelancers! Side hustlers! Work from home-homies! Listen up! This one’s for you:
So, you’ve started a side hustle. Bravo! Usually getting started is the hardest part.
And, now, you’re putting yourself out there. Maybe you even have a basic website or a blog. Maybe you’ve got some basic social media accounts down. Good for you.
But, how do you start bringing in business and charging a living wage for your (no doubt) exemplary services?
That’s the really hard part.
Got a Side Hustle?
I went from working crazy hours as a middle-school English teacher to working from home as a freelance writer a year after I started building my side hustle.
Since then, I’ve had the opportunity to write for hundreds of companies all over the world, many of them household names.
Related: Find out which 21 high-paying sites I use to find freelance writing gigs!
I went on to start a social media management company and a successful blog, too.
I’m a hustler, baby 😉
How To Freelance Like a Pro:
As you can imagine, I have learned some invaluable lessons about how to make your side hustle look legit.
Nobody has to know that it’s a new business or a side hustle or you’re a one-man-show writing in your yoga pants. #salud
You can fake it until you make it, my friend, and I’m going to show you how.
Here are 5 free tools that you can start using – today – to make your side hustle look like a legit business so you can attract the clients you want and grow your business.
Gotta make that money, honey. #BeTheBoss
1. Free Logo Design
You’re going to need a logo. It doesn’t have to be spectacular. You also don’t want it to look too cheap.
There are a few totally free logo sites out there. Here are a couple of my favorites:
Hatchful:
You’ll answer a few easy questions, like brand name and company niche (beauty, cars, etc.). Then, they pop-out a bunch of logos. You can click on any logo you like and Hatchful will take you to a dashboard where you can further customize the logo easily. This is what it looks like for one of the logos I picked:

And then, when you’re ready to go – you select your logo and get taken to this screen, where it shows you everything that will be included in your downloads:
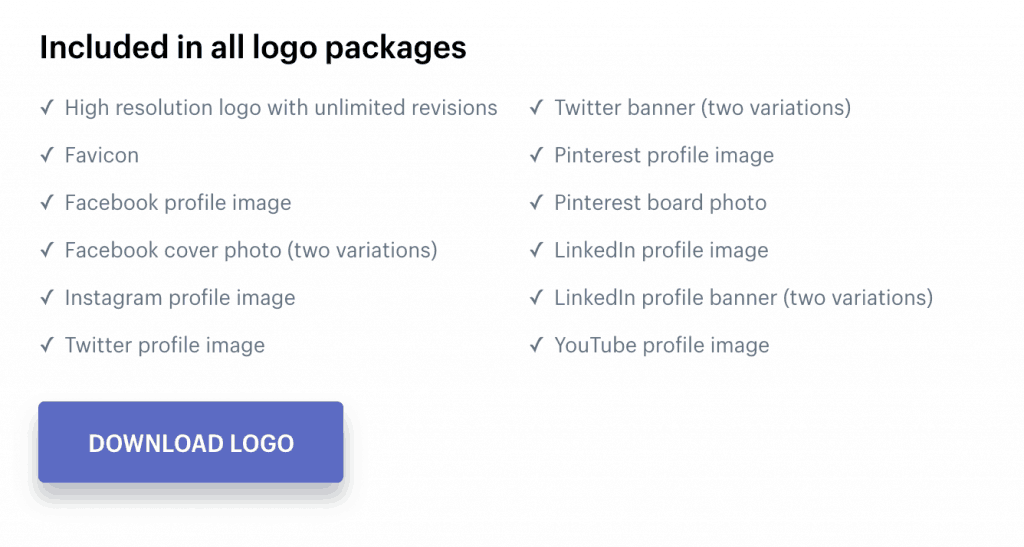
That is pretty epic! Hatchful is super easy, so even with zero graphic design or even technology skills, you could put something together on Hatchful that you can use right away.
Canva:
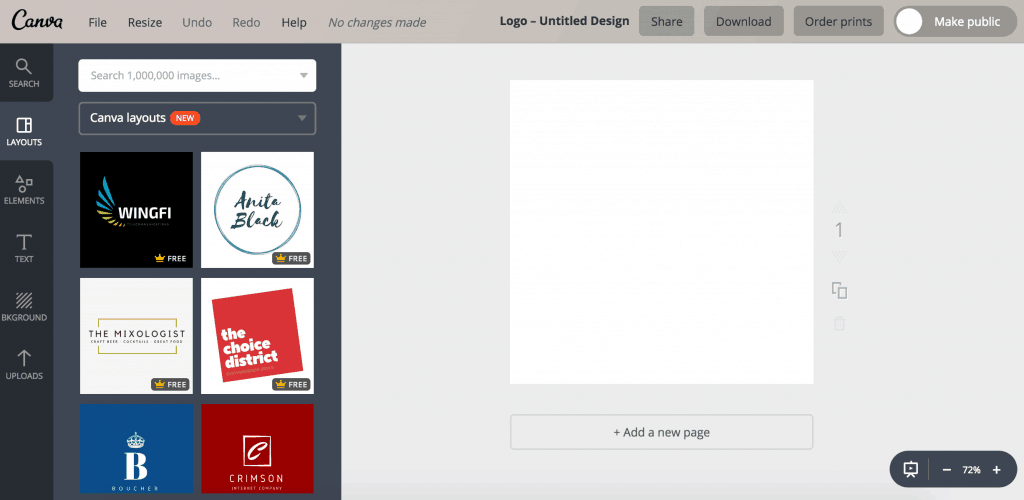
Canva is an amazing resource for designing all types of images, from logos to social media pics and more. After you open a totally free design, click “Create a Design” in the top left. Scroll down until you see the logo graphic.
Then, you’ll see a dashboard that looks like this. On the left, you can scroll through a bunch of free layouts, icons, ideas, royalty free images, etc. Customize to your hearts content.
When you’re finished, just download the file. Then, use the resize tool to format it for different purposes. There are free templates for everything you can think of – social media headers and more.
If there isn’t something you need, go back to “Create a Design” and look for the CUSTOM DIMENSIONS option on the top right of the page. Put in the dimensions that you need and voila! You’re ready to go.

Canva is also my top recommendation for designing images for your social media accounts. It literally couldn’t be easier.
It is actually really hard to believe that it’s free.
Don’t Know Where To Start?
If you’re stuck on colors, branding, logo ideas – Pinterest is your best friend.
You can search “branding and logos” and pull up a ton of free layouts that will give you everything from color palettes, logo suggestions, fonts that pair nicely with them, etc.
Then, once you have a great idea of what you’re looking for, start experimenting with one of these free design tools to create something you can live with.
Once you have it figured out, download it in the different files needed for the various social media accounts.
Don’t worry if this isn’t the best logo ever. Once you get your business off the ground, you’ll loop back around and pay someone really talented to create a custom logo from scratch.
Rather Just Pay Someone Else?
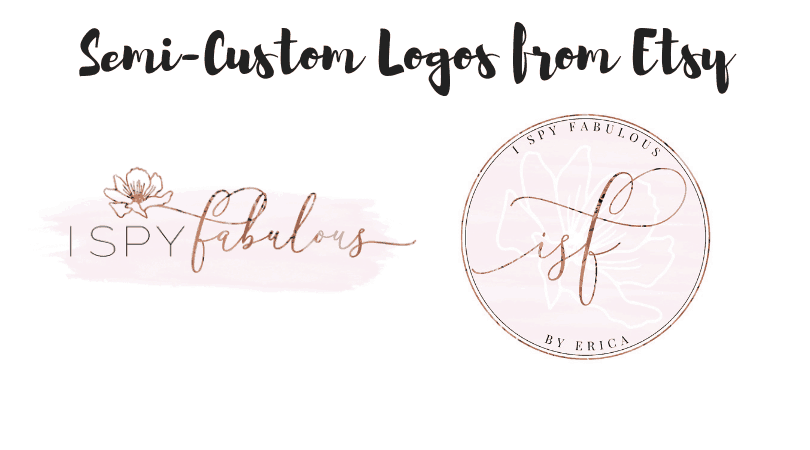
If you don’t want to spend the time creating it yourself and have a little bit of money to spend, consider doing what I did for this blog – and get a semi-custom logo off somewhere like Etsy or Logaster.
Etsy:
How this works on Etsy is they have already created the logos. You buy the one you like, they will customize it with your brand name and make small tweaks according to your preference.
You will pay something like $30-50 to get the full suite of logos needed for your social media sites, etc.
For example, here are the logos that I bought semi-custom from Etsy:
If you’re interested in checking out semi-custom logos on Etsy, here are a few shops with beautiful work to get you started.
- Zoku Designs: Perfect reviews, beautiful floral, feminine work
- Cicada Street Designs: Rustic, farmhouse, sweet styles, 61 perfect reviews
- Jupiter Street Designs: flora, fauna, watercolor, almost 2,000 perfect reviews
- Macarons and Mimosas: gorgeous watercolor logos with metallic embellishes, great reviews. Very feminine, on trend, great for social media.
- Fresh Lavender Designs: Adorable designs, some with a childlike spirit, great for a child’s brand, but also more sophisticated designs. Both semi-custom and lots of custom work, too.
- Indie Grace Design: Rustic, font-based designs, some more masculine, uses edgier prints like buffalo plaid, great reviews
- Luna Blush Designs: The designer I used for my blog logos. She was quick, very easy to work with, happy to make customizations, and her work is – I think – beautiful. Whimsical, watercolor designs with metallic foils. She has some really unique looks using moons, lotus flowers, and more.
There are so many more. To find them, simply search “logo design” and scroll until something catches your eye.
Logaster:
Logaster works similar to Hatchful, but they have more logo options that are a bit more professional for a small price.
For example, here is the logo I was able to quickly create by myself on Logaster and could’ve downloaded in all files needed for just $29.99:

Logaster is actually VERY cool. It’s also super easy to use, because you have a lot of options provided to you, and it shows you everything broken down, such as types of logos you will need, different color backgrounds, and even a branding guidelines layout like this:
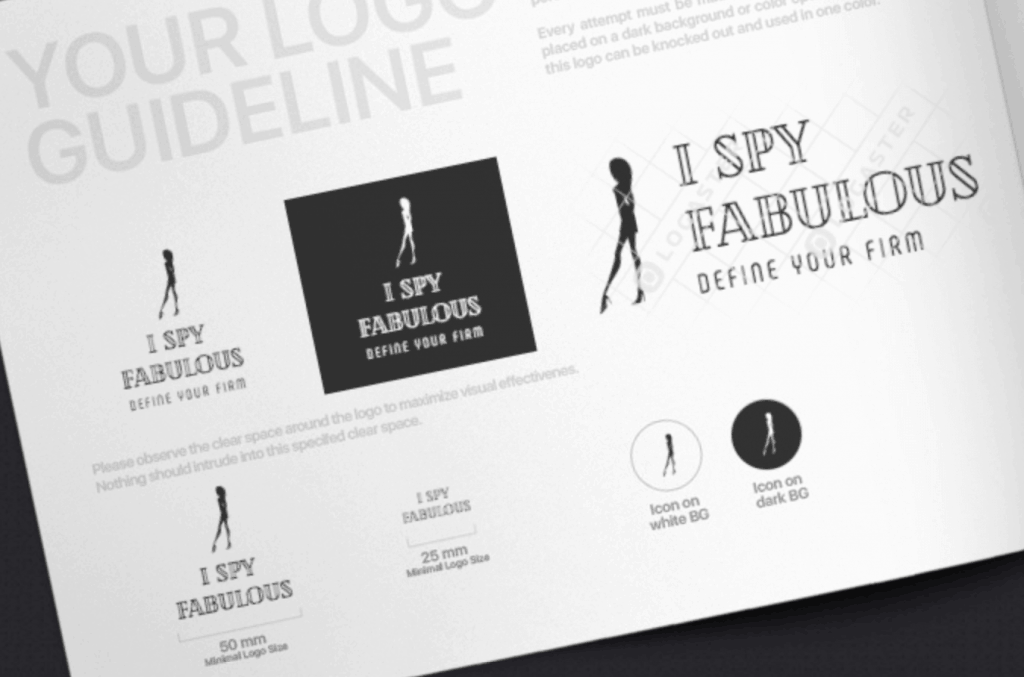
ROOKIE TIP: DO NOT, under any circumstances, pay for a logo that will not be delivered to you with the full-suite of social media logos.
The worst thing you can do is put a logo that is incorrectly sized into your social media accounts and let it lop over the sides of the space allowed.
If you are paying for it, do not put money down on something that will not be delivered to you with everything you need.
Great, so now you have a logo. Let’s move on.
2. Free Logo Signature
Since you’re still operating on the free plan here, I’m going to assume you have not invested in a custom email to match your website. For example, my blog is I Spy Fabulous, so my email is [email protected].
Even if you don’t have a sweet custom email – you can make whatever email you’re using look legit by adding a free signature.
And please, don’t use your old college email with a name like “TastyCupcake88”. If you don’t have a slightly less embarrassing email address, just open a new one. Keep it short and sweet without a bunch of things to remember.
And, even if you have a business email, you can still download this free email signature tool.
So, go here and download WiseStamp.
Customize the email signature template with the logo you just finished making, the new email you just opened, a website or link to an online portfolio if you have one (if you don’t, you will by the end of this blog post), and social media accounts for your business.
You can choose to have an inspirational quote added, which I like, because I like cool quotes. #nerd
Here’s a screenshot of what my free WiseStamp looks like:
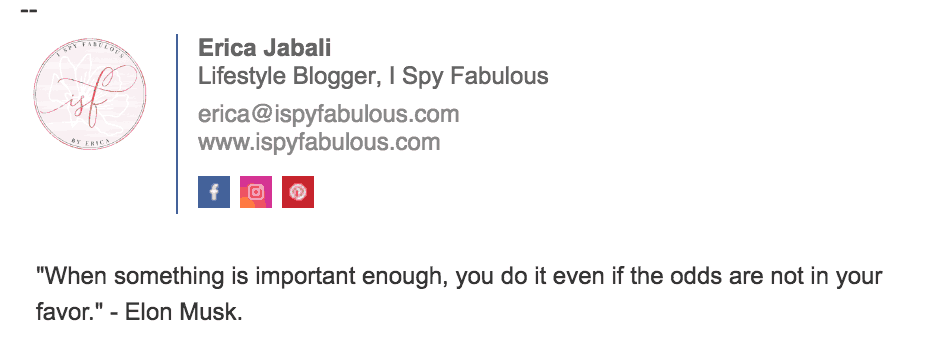
You can get it without the WS logo if you pay. I have not yet paid. I like free things.
ROOKIE TIP: Make sure any social media accounts being used for your business are actually business accounts.
There is a difference between a regular Instagram and a business Instagram, and this is true for all of the utilities. For one thing, you’ll have access to important insights and analytics about your audience.
Great, now your email looks professional. It’s time to rock ‘n roll:
3. Free Invoice Creator
Now you look more professional when interacting with potential clients. Hopefully, you’ve started to book some work and are in the process of figuring out itemized proposals and contracts.
That means it’s time for a proper invoice.
Trust me on this – the more professional your invoice looks, the faster you will get paid.
I have experienced this personally time and time again – the easy way and the hard way. So, I’m going to say it again:
The more professional your invoice looks, the faster you will get paid.
There are a 3 ways you can invoice:
- Google Docs. Search invoices. Customize one with your info and logo. Send. This is pretty much as generic as it gets, but it’ll get the job done. It will NOT give them any immediate payment options. This is the slowest way to get paid.
- PayPal. Set up a PayPal account. Add logo to an invoice template. Send. This will get you paid a little faster, but you’d be surprised how many people still do not have PayPal. PayPal does take a percentage out of your payment for processing it for you.
- WaveApps.com: A free invoice service that allows you to create professional looking invoices, tracks them for you, and makes it easy to create receipts after payment. WaveApps also allows for multiple payment options, including credit cards, and that, my friends, is why this one will get you paid quickly!
When I made the switch to WaveApps, I saw a DRAMATIC increase in how fast I was paid.
Here’s the blank invoice on Wave before you customize. You can see how simple it is to use, but when filled it, how clean and professional it would look:
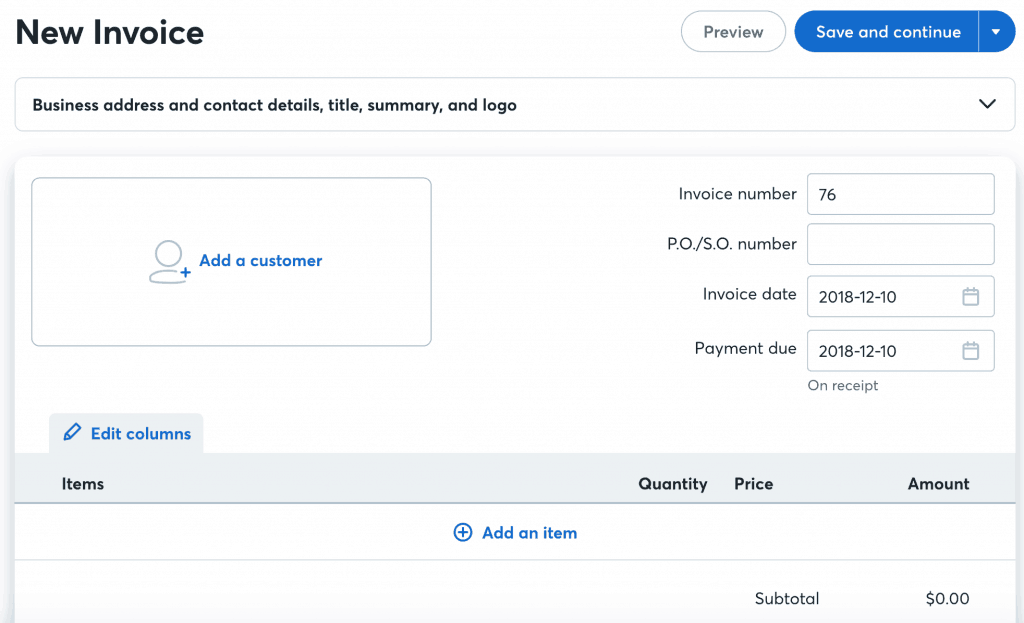
When you send it, your client will get a professional looking email with a link to the invoice and very obvious options for payment.
Then, once they have paid, you are pinged and can send them a receipt.
THE RECEIPT IS KEY.
Your clients will love getting receipts!
This is great for accounting, but also to close the loop for them that it has been received.
Wave is free to send invoices, however, you will pay a fee out of your payments – similar to PayPal.
The only completely free way to invoice is Google Docs, where clients will have to send you a hard check. But, expect it take longer.
Personally, I’d prefer to give up less than 10% of the payment to get my money in hours.
I will seriously not make a dime if you open an account with Wave, but it is still my #1 recommendation to you for free invoicing.
Want a More Robust Invoicing Program?
Once you are really cooking, you’ll want to check out Honeybook. With built-in proposal and contract templates, a networking board that allows you to meet potential clients, and many other cool features, it’s a service that will pay for itself very quickly once you’re up and running.
Honeybook is around $20 a month for the service and then they take a small cut from payments made using the system. You can get 20% off your first YEAR of Honeybook by using my referral link.
To be able to track products start to finish in their system, as well as even source new gigs and network, Honeybook is an investment in your business that will pay for itself.
Check out Honeybook here.
4. Free Portfolio Creator with Carbonmade
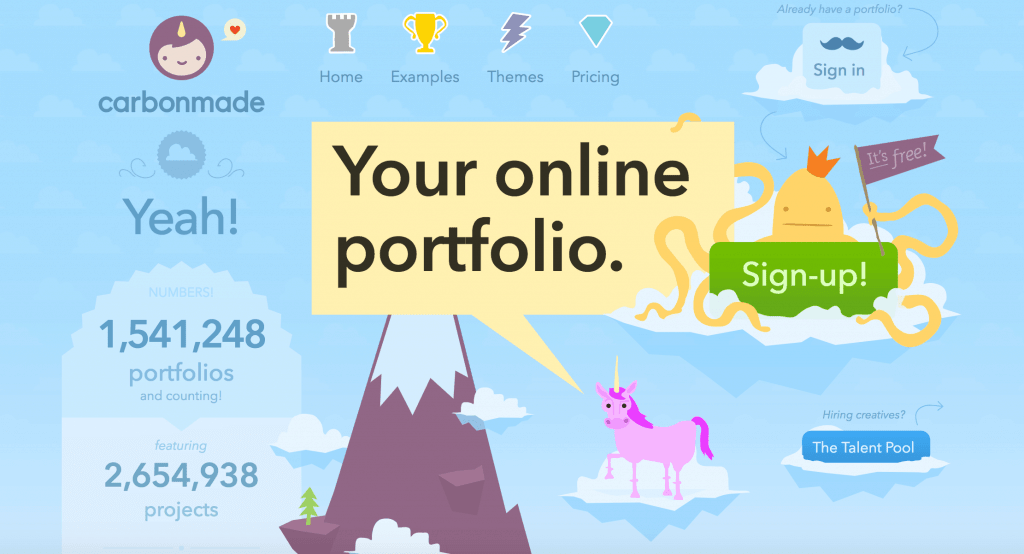
It’s time to create an online portfolio to showcase all your work.
You can upload a handful of your best work to your new online portfolio on Carbonmade, for free.
The Meh Plan offers you 5 projects and 35 images, along with other customization options, such as more information about your experience, background, etc.
Now, you can link your own Carbonmade portfolio URL in your emails and sent to potential clients.
Voila!
#MuyProfesional
I saw a very quick lift in how many of my proposals were accepted after opening a Carbonmade portfolio.
It was so effective, I upgraded to the $6.95/mo plan to be able to add video, since so much of my work is video scripts, and then saw an even greater return on accepted proposals.
If you do only the free plan – which still looks really professional – be sure to make a comment when you send it to clients that says, “Please take a look at my online portfolio, which offers a small sample of my greatest hits. I am happy to send more work samples on request.”
This is important so that the person knows it is just a snapshot.
Because the free portfolio limits you to 5 projects and 35 images, you may need to swap them in and out based on the niche of clients you are currently prospecting.
You will love the convenience of having a portfolio ready to go when it’s proposal time. And, I’ve even had clients find me on Carbonmade and reach out to me!
5. Free Social Media Scheduling
At some point, you’ll want to start scheduling your social media posting. It gets very laborious to post repetitively on all your social channels, particularly if you’re posting the same thing.
And, since each channel peaks at a different time of day, and sometimes, day of the week, it can also be nice to schedule your posts when they’ll have the most impact.
After years of freelance writing and listening to how many companies were using social media to explode their businesses, I started using social media scheduling software religiously.
Top 2 Free Social Media Scheduling Programs:
There are two scheduling software programs that are feature rich and will give you up to 3 social media sites for FREE. Seriously, for FREE.
- Buffer: This is my top pick for newbies because the platform is simpler, easy to navigate, and doesn’t overcomplicate it with features you won’t be using in the beginning. You can easily customize how the post will look for each utility and you can use their scheduling recommendations to optimize reach or just post it when you want to post it. The calendar allows you to see how you’re scheduling things out, so you can fill in any gaps.
- Hootsuite: Hoot is really one of the premier scheduling softwares out there today. They have some of the most robust programs with insights on top of insights on top of insights. More than you could ever really want to know unless you’re at the enterprise level (you’ll get there ;). Hoot also offers a free package with up to 3 social media accounts for FREE.
So, take a look at both – see which one really works with your brain.
The best social media scheduling software is the one that you will actually use.
Want More?
Once you’re really playing the game – there are so many more to choose from, each offering their own unique bag of tricks. Many have a free period where you can try it out, but then there is a small fee to keep using it.
- Loomly has the cleanest, most user-friendly interface I’ve seen yet – at just $10 a month.
- Meet Edgar uses a unique algorithm to recycle content.
- Planoly for Instagram, which is free for one Instagram account and up to 30 posts a month
- Tailwind for Pinterest.
- Tailwind will literally skyrocket your Pinterest. I went from 0 to 277,000 monthly views in 2 months using Tailwind.
**UPDATE 2/2020: I now have 1.6 million monthly views on Pinterest and add hundreds of new followers every week/month. My Pinterest strategy is a combination of Tailwind, skills I’ve read online and some very effective tricks I’ve learned on my own. Pinterest is your friend people.**
You can get a free month of Tailwind by using my referral link!
So, that gives you some sites to start with. Take a look around. Try them out. Use what works.
*****
Whew! Are you still with me? That was a lot of info. But, I think it’ll be incredibly useful to you and really up your side hustle game if you start implementing them.
Have you tried any of these yet? Do you have a recommendation that we should add to the list? Let me know in the comments below!
If you’re interested in career focused posts like this, you might also like these ones:
- 5 Ways Task Batching Will Make You Crazy Productive!
- 10 Tips for How To Attend A Conference By Yourself!
- 10 Tips for How to Increase Your Confidence!
Happy hustlin’.
Have a fabulous day,
E
This was so thorough, thank you!
Author
So glad it helped! If there’s anything else you need help with, let me know!
Wow! Such great info! I may just start a business now!
Author
You should! Make that money, honey!
Great post! These 5 FREE TOOLS are absolute lifesavers. Canva and Trello are my go-tos for design and project management, and Grammarly is a must for flawless writing. Thanks for sharing such a helpful list!
Author
Grammarly is great, for sure! Glad you agree!