
Over the years, I have met many women who have told me that they never learned how to apply eyeshadow – and so when they go to apply their makeup, they feel like they are just guessing.
Back when I was a makeup artist, I heard similar things from almost every person who sat in my chair.
So, today is all about an easy, step-by-step tutorial on how to apply your eye makeup – for total beginners!
Tips for Applying Eye Makeup:
First off, I’d like to say that my model is my cousin, who recently told me that she never really learned how to apply her makeup properly – and that really inspired this post. She was willing to be my model, even though she is feeling a bit shy about it.
Second, what I like to do when applying makeup, is lay out all of the colors and tools I’ll be using, so that once I get started, I’m not fumbling around while my makeup is setting.

There are pieces here for the face that I used for another tutorial coming soon.
When doing someone’s makeup, I always wash my makeup brushes in advance. I prefer to use my own makeup brushes when working on others, because I know exactly how much product they pick up and how they work on the skin. These are my all-time favorite and currently 50% off at time of posting.

If you’re interested in trying any of these products, links are sprinkled into the tutorial. Please know that some of these are affiliate links, which means I’ll receive a very small comish at no cost to you.
Step 1: Prep The Face

Whenever you are applying makeup, you want to prep the face. I like to use this lotion with SPF 30. I’ve written before about how much I love it in this post.
This goes all around the face and neck.
You also apply a nice eye cream around the delicate eye area. Pat pat pat. I have written about all of my favorites in a post on How To Reduce Dark Undereye Circles.
You let these two products set while you grab your eyelid primer.
Step 2: Apply Eyelid primer

No matter what age you are, you will appreciate the benefits of an eyelid primer. These act as a nice blank canvas for eyeshadow.
Also, they help eyeshadow apply more smoothly and get more pigment from your eyeshadow – saving you time and money.
These eyelid primers last a looooong time, so there is value in buying a good one. I have used this one for years:

Although, this budget option has hundreds of perfect reviews on Amazon.
You just need a tiny dot on each eye.

Smooth the primer around the eyelid and up into the crease.
Step 3: Time for Eyeshadow

Here we go – the good stuff. Pick up your eyeshadow. For newbies, I really like eyeshadow palettes that have all the colors together for you. 3 or 4 colors are enough for this look – and for most daily looks, so we will only be using 3-4 of the colors in the above palette.
Personally, eyeshadow is a splurge product for me, because the higher pigment and easier application saves me time, looks better, and lasts longer.
I have eyeshadow palettes from Dior that I have used 2-3x a week and still last me two years!
- I feel Tarte has a similar quality and is a clean beauty pick. I am using this one on Amanda.
- Honest Beauty also has some beautiful palettes that are clean.
- MAC is not a clean beauty pick, but their eyeshadows are some of the best in the business.
When looking at your palette, pick the medium shade for your lid. This works best for most people. If you have very large eyelids, you may want to go with one shade lighter.
Step 4: Applying Eyelid Eyeshadow

- Pick up your eyeshadow brush and pat your eyeshadow color once or twice.
- Then, tap tap tap the brush against the side of the palette to shake off excess. You do this so that the excess makeup doesn’t fall into your eye or down on your cheeks. Some makeup will drop, but you’ll ignore it until later.
- Then, it’s time to apply it to your eyelid. Always start with the brush on the part of the eye that you want the darkest color, which is the crease and outer corner.
- When applying any skin care product or makeup on the face, always brush outwards, towards your hair line. This is a way to train the skin over time and help minimize wrinkles.
- Then, start working your way in small brush strokes outwards, towards your hair line, while moving towards the inner corner of the eye, where you want the lightest color.
- If it’s not dark enough, pick up more color, tap tap, and do the same thing again. Always start with the brush on the part of the eye that you want the darkest color.
- You’ll take this medium color from the corner of the eye all the way to the crease.
- Blend blend blend. Keep small brush strokes until you feel the color has no harsh lines anywhere on the eye.

Step 5: Applying Crease Eyeshadow

- Pick your eyelid crease brush. For smaller eyes, you want a small crease brush. I use the smaller one. For Amanda’s eyes, which are a bit larger, I am using a slightly fluffier brush.
- Now, you will dab the darker color in your palette. Or, you can mix the two darker colors to create something a bit softer. Tap each color once, or the darkest color once or twice. Tap tap tap to remove excess.
- Now, start on the furthest part of the eyelid crease and make tiny brush strokes outward in a cat eye shape. Work your way towards the middle of the eyelid, but always brushing outward, and blending as you go.

- You are ultimately working to create a soft V shape on the same of your eye, with the darkest color in the crease and outer corner of the eye.
- With what is left on your brush, soften the edges up over the crease, so you don’t make your eyes look sunken in.
- Blend blend blend.

Step 6: Applying Brow Bone Eyeshadow

Some artists start with the brow bone color and work down. This works if you are very good at blending. For newbies, I always ask you to do this part last, because it will help you blend the crease color.
- Pick up your fluffier brow brush and pick up the lightest color. For this you want something skin tone or slightly lighter than skin tone. Stay away from glitters or highlighter colors unless you really want to draw attention to your brow bone.
- Keep in mind that if you choose a color with shimmer for this part of your face, it will pick up light when photographed with a flash and create very distinct lines. For this reason, I encourage most people to use a matte color for this part of the face.
- Then, start at the highest point of your brow bone and beneath your eyebrow, working in small brush strokes outward towards your hairline.

- Work towards the front of the eye, down towards the inner corner of the eye.
- Use this brush to blend the brow bone color into the top line of the crease color and remove any harsh lines that might be remaining.
CHECKPOINT:

At this point, your eyeshadow is applied and you are ready for eyeliner. Once your eyeliner and mascara are applied, the eyeshadow will look a bit different – so don’t judge your results too harshly yet. You are mainly going to look for a couple of things:
-
- Are there any harsh lines you can smooth out? Using the brow bone brush and the lighter color, you can do this.
- Does the eyelid color look too light or dark to you? It’s easy to adjust with a lighter swipe of color or another swipe of the medium color. Again, this will look different when finished, so don’t make drastic changes.
Step 7: Applying Eyeliner
It’s time to apply eyeliner. I have very sensitive eyes and am very picky about my eyeliners. I wrote a post on my other blog about my favorite eyeliners for sensitive eyes and you can find it here.
For Amanda, I am using a discontinued Honest Beauty eyeliner, but highly recommend this clean beauty eyeliner from Burt’s Bees.

- Start by sharpening the pencil. It should be pointed, but not sharp.
- Then, using one hand to pull the eyelid taught, but not so much that it hurts, just so the skin is tight, use the other hand to start applying the eyeliner in small brushstrokes in the center of the eyelid and working outwards.
- You can use a smoother line if you have a steady hand. If you don’t, just make small strokes and connect them as you go.
- Once you reach the outer part of the eye, slightly lift at the end, or extend a little bit to give it a cat effect.
- Every person looks good with a small lift at the end. Sort of like a mini-eye lift.

- Look up, keeping gently pulling skin tight, and start applying eyeliner from about the center of the eye and working outwards.
- Do not worry about perfection – we will fix the line when you are finished.
- When it’s applied, take a Q-Tip – I like generic store brand Q-Tips because they have less cotton fluff and create less issues – and either wet it with a small bit of water or with your mouth.
- This Q-Tip is now your magic eraser. Use it to gently erase any extra undereye eyeliner that you applied and create that perfectly straight line.

- The eyeliner under your eye should be very minimal and right under and in between your eyelashes. Too much eyeliner here is not a good look.
- Sit back and look to see if both eyes match.
- If you got any eyeliner on your eyelid, use a DRY Q-Tip to gently erase the eyeliner and preserve your eyeshadow.
Step 8: Applying Mascara
For mascara, use what works for you. For Amanda, I used my drugstore, clean beauty pick – Burt’s Bees Nourishing Mascara in Black.

- Start by curling eyelashes. Place eyelash curler close to lash line. Gently squeeze. If it hurts, stop and pul it out a little so it’s a bit further from the lash line. Try again. Gently squeeze a couple times.
- Then, start by swirling the mascara brush – never pump the brush – in the mascara tube.
- Lift the brush, dab any chunk on the rim, and start applying on the OUTER part of your upper eyelashes first, where you want the most prominent length and color.
- Work your way inward by brushing from base to tip. You can use a little windshield wiper technique to keep lashes from clumping.
- Then, with what is left on your brush, brush your lower lashes.
- Repeat 2-3x as needed to achieve results.
- When finished, if any mascara has gotten under eyes or on eyelids, use the magic Q-Tip technique with a fresh Q-Tip to remove it.
Recommended Mascara
- Drugstore: Burt’s Bees Nourishing Mascara
- High-End: Wander Beauty Mile High Mascara
- Extreme: IT Superhero Mascara – not something I’d use everyday, but for special occasions – WOW!
- Tarte Eyelash Curler
CHECKPOINT:

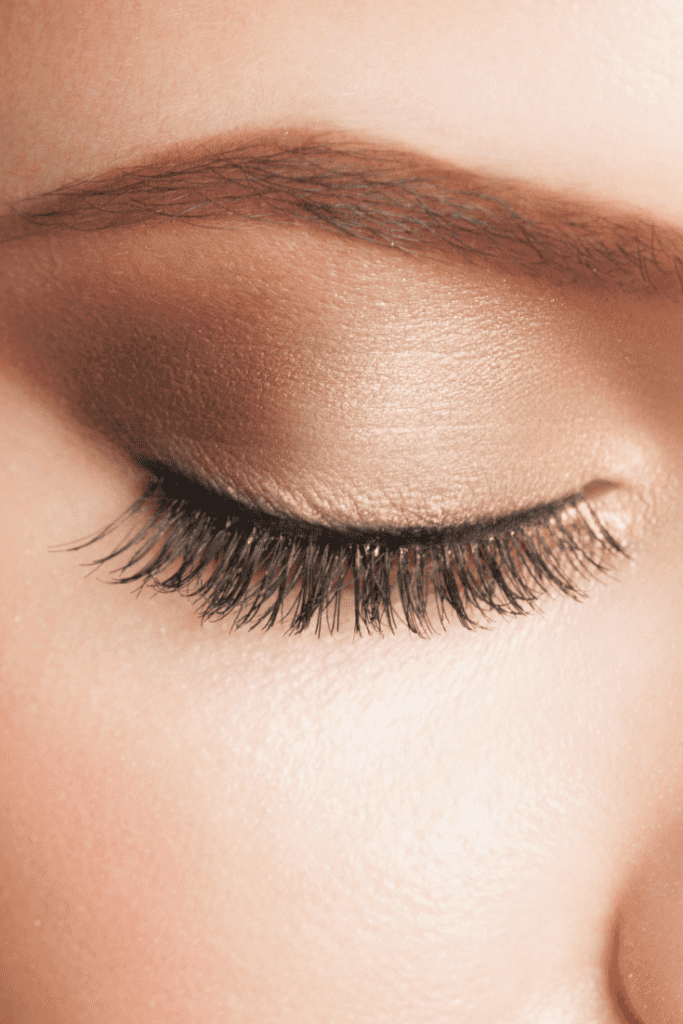
Look at those gorgeous blue eyes – rawr!
Your eyeshadow is pretty much done. A quick brush of your eyebrows and you are ready to go.
Double check that you don’t have any:
- Harsh lines
- Eyeliner smudges
- Mascara smudges
- Imbalance between eyes
For the makeup that has dusted your cheeks, once you apply your foundation or powder, this will brush away, no problem.
I’ll be doing some more tutorials on foundation application soon.
*****
That’s it for today! Just 8 steps to applying a beautiful, blended, classic eye makeup look!
Remember that makeup should be fun and enhance your natural beauty. Applying makeup is a skill that anyone can learn if they are willing to practice. Nobody is born with this!
Please let me know if there are any other tutorials you might be interested in as well!
Have a fabulous day,
E
P.S. Keep me caffeinated so I can write more!
[kofi]

1 Comment