When I was in college, my best friend and I decided to dye each other’s hair. It was a great idea, in theory, except we picked up boxed sets at the store without any concern as to what was already on our hair. Her hair turned gray and mine was orange at the root and black through the ends. Both of our hair was completely fried.
She was able to salvage hers with a professional color correction that cost hundreds (read: not in a college kid’s budget) and mine was not savable. I had to cut it all off to a short haircut that I hated and took forever to grow out.
After that experience, I vowed to never color my own hair again. And then, in 2019, salons everywhere shuttered their doors and my hair began growing out…. with a lot more gray than I remember. Turns out, all those years I was dying and highlighting, I was also covering up the signs that, well, our hair ages right along with the rest of us. Sure, I wasn’t sprouting enough silvers to dive in all the way, but it was enough to make me uncomfortable with waiting out the salon closures.
Custom At-Home Hair Color:

That’s when I found eSalon – the custom at-home hair color mixed by a hair professional who looks at pictures of your hair and a detailed questionnaire on your hair history. After I tried it, my hair looked so much better and my friends and family started asking me how I’d gotten my hair done when nobody could go to a salon.
But, dying your own hair at-home, without even an extra set of hands, requires a certain preparation and how-to. That’s why today, I am sharing my best tips for how to dye your own hair at home, with or without eSalon (although I do recommend it), so that you end up with gorgeous, luscious locks – and not hair so fried you have to cut it off.
I buy eSalon with my own money, but I did join the affiliate program after loving it. If you decide to try it through my links, I’ll receive a small commission at no cost to you.
Tips for Dying Your Hair At Home:
1. Order Hair Color:

Whether you’re using eSalon or a different hair color, take time to choose your hair color carefully. Consider the condition of your hair and how much hair color is already on your hair when choosing a color.
Also, usually when coloring at home, you don’t want to try to lighten more than 2 shades or you could have unexpected results. You’ll be happiest if you stay within a couple shades range of what you currently have.
This is one way that eSalon was a good choice for me. I was happy that I could send pictures of my actual hair and hair history to a hair colorist who could help me achieve the results I wanted.
2. Set Aside an Hour:
Plan to do this when you have about an hour to yourself without distractions. Maybe the kids are asleep or you get up an hour early. Whatever you do, don’t rush this process and you don’t want to be running around the house with dye on your head.
3. Get Set Up:

Don’t start mixing that color right away. Sure, that’s the fun part, but it’s going to take you a few minutes to set up your area. If you’re using something like eSalon, you’ll be sent a complete kit with everything you’ll need. Here’s what came with mine – which I bought with my own money:

- Developer and custom color for my roots
- Developer and custom color for my ends
- Brush
- Drape (I paid extra for this – $9) – highly recommend
- Two pairs of disposable gloves
- A kit with small shampoo, conditioner, stain guard for skin and color wipe (LOVE THIS)
- A detailed instruction booklet with a sticker to attach it to your bathroom mirror – (UM, GENIUS!)

All in all, it feels very customized and well thought out. My developers and root/ends colors were different, and the instructions asked me to leave them on for different periods of time, so I definitely felt they looked at my pictures and made changes to match.
Honestly, my goal was simple – get a nice even color from root to ends without destroying my hair.
4. Prep Your Area:

Once you get started, it’s going to feel like it’s moving really fast. Prep your entire area so you’re able to focus on that hair color. Here are some things to think about when setting up:
- Wear clothes you don’t care about or a hair coloring drape
- Cover any counters or floors with old towels to catch dripping. Dying your own hair is messy.
- Lay out everything you are going to need in the order you will need it.
- Read all instructions thoroughly. ESalon can often require two hair colors, one for root and one for length, if you’ve colored before, so make sure you know what you’re doing. You don’t want to rush.
- Prep your shower or where you will rinse your hair. You don’t want to make a huge mess because you didn’t have your hair washing station ready.
- Have a sponge to wipe down the hair dye that will go all over in your shower or bath. Don’t let that sit.
5. Mix hair color carefully:
When it is time to mix, follow the instructions and mix carefully. Especially if you’re using eSalon and have multiple colors, you don’t want to mix up the different things.
Plus, only mix one color at a time. If you need two, like I did, mix one first, apply it, and then mix the second color.
6. Apply Your Hair Color:
Now that it’s time to apply your hair color, you want a plan of attack. I read up on line on how to do this and also thought about how I saw my hair colorist section off my hair when she applied color.
So, I started by clipping my hair into four sections. I put the stain guard around my hairline all around. Then, I mixed the root color and developer, shook it until mixed, and started applying.
I used the bottle to apply hair color the first time, but I use a brush and bowl now and have also used a brush and bowl on my cousin when doing hers for her. The bottle was a mess. Learn from my mistake.
After applying the root color, I set the timer and started mixing my ends color and developer. When it was time, I applied it to my hair, which is difficult because my hair is long. It’s hard to get it all the way through without dripping, so that’s where those old towels and prep comes in.
7. Wait and Rinse:
Once your color is applied, pin it back up and set the timer. While you wait, use the stain remover cloth to get off all the dye that has landed places. I took this time to clean it off my skin, my counters, my floors, my hands, and anywhere else the color may have gotten. The sooner you clean it, the easier it is.
When the beeper beeps, it’s time to do the last step – mixing water with the remainder of the color and pouring it all over your hair before massaging it in.
I was actually surprised a how easy this part was and how nicely all of the color came out. I thought it would take longer or be messier, but it rinses out really cleanly.
I went to a colorist a few times who did a great job, but left a ring of hair dye all along my forehead and neck. By the time I got home, I would have to scrub until my skin was raw to get it off. Horrible. I ended up changing colorists simply because of this discomfort. I was very relieved to not have that experience at home. Turns out, if you take it off right away, it’s not difficult.
8. Plan for Ventilation:
Hair dye has a strong smell, especially if you’re lightening, make sure to plan to do this where you have some ventilation.
Open a window, put on a fan, run an air purifier. Do whatever you need to do to get some fresh air in that space while you’re working. I found the smell very strong and kept opening more windows and doors. After the first time, I was more prepared and had a better plan for ventilation.
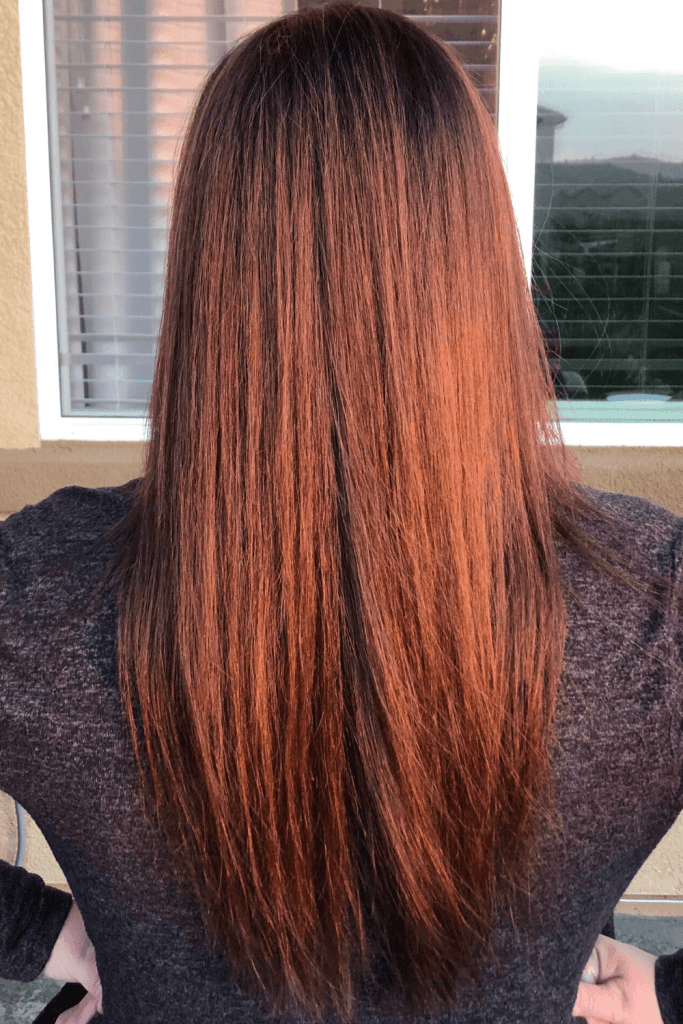
ESalon: The Results

So, how did it turn out? Well, the first time through, even with some mistakes, I really loved the results. My hair looked shinier, smoother and the color was even throughout.
I started practicing on some friends and family who had great results, too, and when I did my own again, I was more organized, calmer and had even better results.
It can be really fun to take ownership of something like coloring your hair, especially after spending years and years paying hundreds of dollars and sitting in a chair for 4 hours.
I’ve gone back to highlighting my hair again recently and I’m already starting to see some dryness and damage from it. Now I know that when I want to go back to doing it myself, I have a tried and true system with custom hair color that I can do easily at home.
If you haven’t tried eSalon, and you’re interested in it, check it out here.
****
Hair is important. It’s worth it to me to find great products from coloring to styling. I love sharing what I find with you. Here are some more posts on hair you might like:
- 9 Bathroom Organizers from Amazon for Hair & Beauty Products
- 10 Affordable hair bow sets for girls from Amazon
- 3 hydrating hair masks for dry/damaged/colored hair
- Is the Dyson Supersonic hair dryer worth it? I had to find out!
Have a fabulous day,
E
